Once you’ve spent any amount of time in the woods, you’ll probably discover that you need some kind of protection from the elements. Or as Mick Jagger once sang “If I don’t get some shelter …Oh yeah, I’m gonna fade away” . Well hopefully and despite the recent hot weather, it won’t come to that, but making a comfortable area where you can rest, brew a cup of tea and make a simple meal will probably be quite a high priority for you.
We have looked at sheds before and their role in providing shelter and a safe place to store tools for forestry purposes. This is not an article about sheds or more permanent structures which may or may not need permission of some kind from the planners, for more detailed information on this, see our leaflet:
https://www.woodlands.co.uk/owning-a-wood/sheds-leaflet.pdf
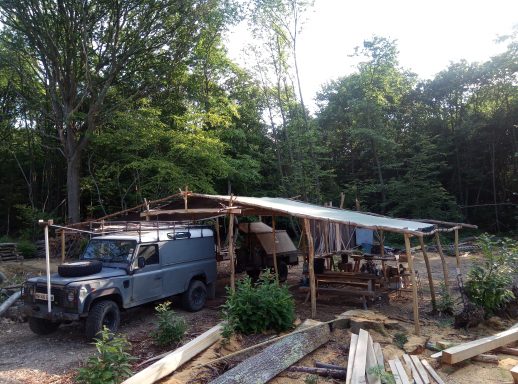
This article is intended as a guide to putting up a simple tarpaulin type shelter, using one I built earlier this spring as an example. It will be temporary, but may last a few seasons depending on what kind of wood you have available and the skills and techniques you are able to muster.
Tarps are a lightweight roofing option which are intended for temporary structures only like market stalls. They will keep off the worst of the rain and provide shade from the sun, but offer very little protection in a full blown winter storm and usually don’t survive anything more than a smattering of snow. For this reason it’s advisable that for this kind of shelter, you at least remove the tarpaulin in the winter or when bad weather is expected.
For materials, I’ve used a fairly robust 260gm per sq m polyester fabric. These are relatively cheap and can be purchased in many different sizes, it’s not ideal, I would prefer to use a more traditional and natural cotton canvas, but one this size would be prohibitively expensive and weigh considerably more. Unless you’re wanting to advertise your presence, you’ll probably want to get a colour that blends in well to the surroundings, olive green or camouflage is good, but make sure it has eyelets every metre or so along the edges, these are important.
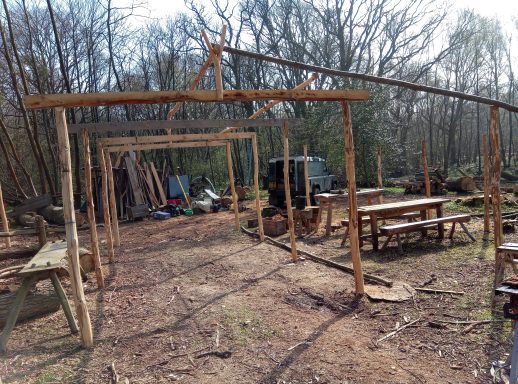
Although there are many ways to rig a tarp, I kept with a fairly basic but low pitched ‘A’ frame approach. Except that I wanted to be able to drive my land rover and trailer through it to load and unload in the dry so I made a ‘henge’ type post and beam construction through the middle and lent the rafters for the ‘A’ frame on top of this, If you’re not wanting to drive a vehicle through it, a single post either end of the ridge line would be okay. I pitched it at a fairly low angle so that the wind didn’t make too much of a sail out of it. However don’t pitch it too low as you will want the rainwater to flow off immediately not pool on top and drag the whole structure down! (This was an easy bit of experiential learning from my last shelter!) I would say 20 – 25 degrees is about right.
I’m quite fortunate that I’ve got a good supply of durable wood to hand. The posts and rafters I’ve made from chestnut coppiced close by and the beams are off cuts of oak I’m milling for another project, again cut on the site. But you can use whatever you have to hand, however, it’s worth going to the effort to peel the bark from your posts, beams and poles, they will dry out much quicker and last so much longer you’ll be glad you did! Part of the joy of building something like this in the wood is finding all the materials at hand without having to resort to the timber yard . If the posts aren’t thick enough, you can always put more in and use diagonal ‘wind braces’ or find a handy cruck to work as a supporting joint. Here’s an opportunity to have fun and improvise.
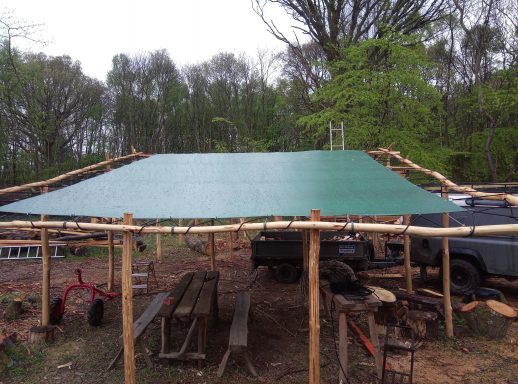
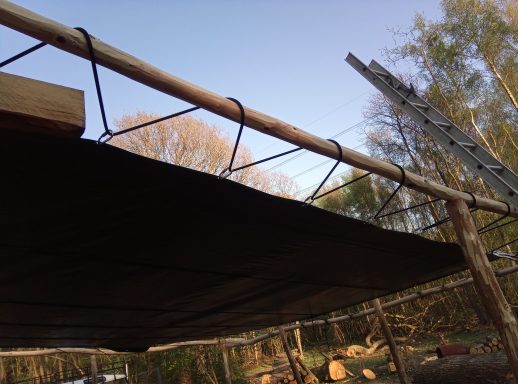
I already mentioned the importance of the evenly spaced eyelets around the edge. Don’t be tempted to skimp on using some of these. You need to distribute the loading to all of these eyelets evenly, using just a few will mean you’ll over stress them and they’ll pull out of the material. I’ve found the best way is to suspend the tarp within the frame entirely holding it up with elasticated ‘bungee’ type shock cord at each of the eyelets. In fact realising that I will need to take it down in the winter should it snow, I’ve added Carrabina clips to each of the eyelets so I don’t have to re-thread the shock cord along the whole tarp.
This shelter has been up since about March this year and although we haven’t seen any true gale force winds yet, I’m really pleased with the way it is holding up. The elasticated shock cord holds the whole thing taught which means the water runs off immediately and the wind shears off it nicely, the most I have noticed in a high wind is a gentle undulation as the whole tarp moves up and down. It remains to be seen how well it might handle any autumn storms, but encouragingly I’ve not faded away yet…. so I could say that so far… I ‘can’ get ‘some satisfaction’.